

Looking for the best Zion hikes with the most stunning views and the most thrilling adventures? Keep on reading for all of the best hikes in Zion to add to your bucket list!
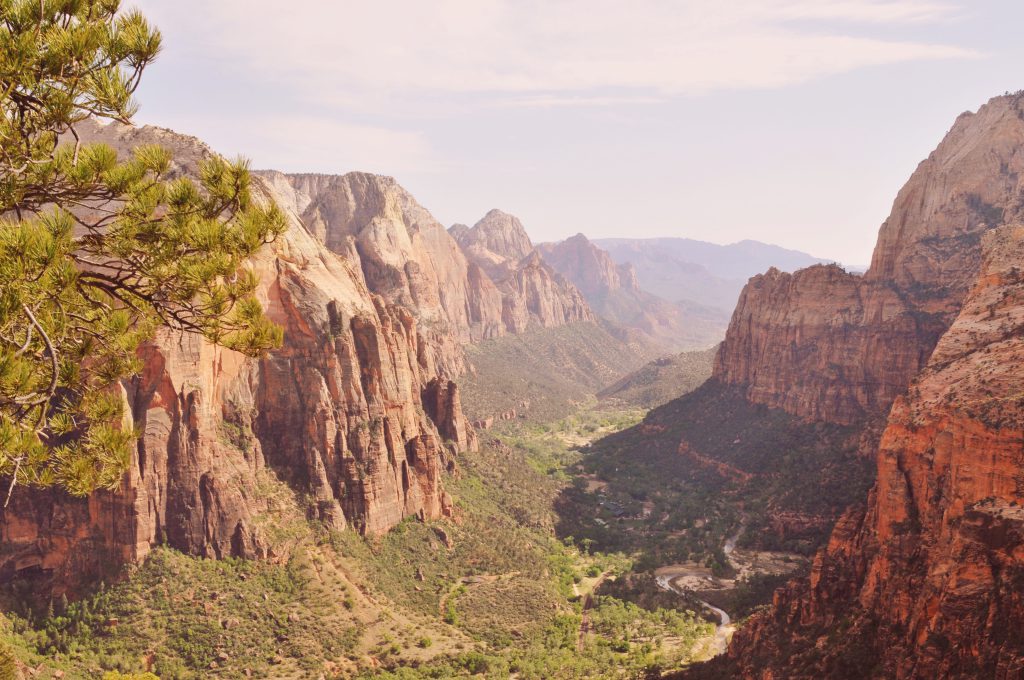
With its tall red cliffs, awe-inspiring hikes, and stunning vistas, Zion National Park has become one of the most popular national parks in the country, attracting over 3 million visitors a year. While the park offers a range of hiking opportunities, suitable for hikers of all ages and abilities, some of the best Zion hikes also provide some of the most unique experiences, from hiking through the Virgin River (The Narrows) and scaling a razor-thin margin on the side of a cliff (Angels Landing).
When my friends Christina and Nancy asked if I wanted to take a trip to Zion to run the Zion Half Marathon with them, I couldn’t pass up the opportunity. I had been hearing about Zion and its beautiful red cliffs, thrilling adventures, and jaw-dropping views from various friends and all over social media, and I absolutely wanted to see it for myself.
While Zion is a relatively small park (only about 15 miles long), there are no shortage of adventures, and my favorite Zion hikes are also some of my all-time favorites that I’ve done. They are the kind of thrilling experiences that end up on people’s hiking bucket lists – for good reason!
And let’s talk about the views. I was blown away by the sheer beauty of it all – Zion is definitely a magical place. While, yes, the harder hikes in Zion will provide some of the most jaw-dropping views, you don’t need to work that hard for some amazing scenery if you don’t want to – just driving through the valley, you will ooooh and ahhhhh at what you see in front of you.
It is also a perfect stop on a road trip of the American Southwest – in relatively close proximity to the Grand Canyon North Rim, Bryce Canyon, and Utah’s other National Parks.
Utah’s oldest national park (it just celebrated its centennial last year in 2019) has a whole lot going for it. Ready to tackle some of the best hikes in Zion? Read on for which Zion hikes you should also add to your bucket list!
Disclosure: This post contains affiliate links. This means that if you make a purchase or booking, I may receive a small commission at no additional cost to you. Pictures & Words is a participant in the Amazon Services LLC Associates Program, an affiliate advertising program designed to provide a means for us to earn fees by linking to amazon.com and affiliated sites at no cost to you.
Things to Know Before Visiting Zion National Park

Entrance Fees
The park entrance fee is $35 per vehicle, and is valid for up to seven days. If you are walking into the park without a car, then it is $20 per person.
If you are planning to visit some of the other National Parks in the area (perhaps as part of a Southwest road trip), I highly recommend purchasing an annual America the Beautiful pass for $80. This is valid at all National Parks and Recreation Areas (there are a few exceptions here, such as Horseshoe Bend), and pays for itself if you visit three parks!
The Zion Shuttle and Getting Around Zion National Park
To limit congestion and pollution, Zion has a shuttle system that makes stops within the canyon on the Zion Scenic Drive and even in the neighboring town of Springdale. The shuttles usually run from April through October and vehicle traffic is allowed during the off-peak months of November-March.
Due to current health guidelines, you must now make a reservation in order to use the shuttles. This new shuttle reservation system will be in place starting February 2021. The fee is $1, and you can find out more here. Reservations can be booked on Recreation.gov. Tickets are released about two weeks in advance, and there are a limited number of tickets released one day in advance of your visit.
Shuttles depart the visitors center approximately every five minutes – tickets are sold in one-hour windows (so if you booked the 7am-8am time slot, you can take any shuttle that departs within this time).
You do not need a shuttle ticket in order to drive through the Mount Carmel Highway (which gives you access to Canyon Overlook), or to access the Zion hikes that start near the visitors’ center (such as the Watchman).
Make a note of the shuttle schedule and look up when the last shuttle departs, otherwise you might have to make a very long trek back to your car after your hike! This may limit you a little bit in the summer, since the last shuttle departs before the sun actually sets.
Weather and Flash Floods
Zion has been known to experience flash floods of the Virgin River, especially in the summer months. Trail conditions can change rapidly, so always keep an eye out on the weather and current conditions here! Some of the hikes, especially ones near the river, can get super dangerous, super fast in inclement weather.
Thunderstorms are also known to occur and can create some hazardous trail conditions.
The Narrows is sometimes closed when the water levels get too high (above 150 cubic feet per second). Some of the trails in the canyon are also prone to landslides and rockfall (especially in the winter), so be sure to check current conditions before you go.

Best Hikes in Zion National Park
Zion has hiking opportunities for hikers of every age and ability, from short family-friendly walks to thrilling bucket-list hikes. It even has opportunities for backpackers looking for multi-day hikes, but I’ve concentrated on the best day hiking opportunities here.
I’ve organized this list of the best Zion hikes by ability, going from easy to strenuous. You’ll find that there is something for everyone here on this list of the best hikes in Zion!
Best Easy Zion Hikes


Emerald Pools
Distance: 3 miles, round trip (1-2 hours)
Elevation Gain: 350 feet
Shuttle Stop: Zion Lodge (#5); or the Grotto (#6) for access directly to Upper Emerald Pools
The Emerald Pools trail is quick and easy, making it one of the most popular Zion hikes. It is actually comprised of two short trails – Lower Emerald Pools and Upper Emerald Pools – that run along a stream, covered in lush vegetation. Water falls down from the cliffs above, creating several “pools.” This is one of the classic Zion hikes, so expect a crowd. This is one of the best hikes in Zion for families with small children as it is easy and short.
Most hikers start from the trailhead across from the Zion Lodge, but you can also access the hike from the Grotto by way of the Kayenta Trail.
If you do hike Emerald Pools, do yourself a favor and do not stop at the Lower Emerald Pools. Yes, the hike there is only about a half mile long and super easy. However, you won’t see much. It could possibly be the fact that we did the hike during the warmer months, which meant that the water was starting to dry out, but I was not impressed with the Lower Emerald Pools at all.
There was just a trickle of water falling from the cliffs overhead, and a few puddles of water on the ground. We went along a bit further expecting to see something more impressive, but then encountered a sign that pointed out the direction to continue along to Upper Emerald Pools.
This Zion hike is best done during the spring and fall months, when rainfall and snowmelt creates much more water in the pools. I have heard that when you hike Emerald Pools in these months, you get to walk under legit waterfalls falling from the cliffs above! The water gets a bit dried out in the summer, but you can still see actual emerald pools if you continue onto Upper Emerald Pools. Be aware that the trail sometimes gets shut down in the winter due to ice and/or landslides.
You will encounter a bit more of incline by continuing onto Upper Emerald Pools, but the trail starts to become more scenic. After a steep and sandy quarter mile at the final stretch, you will get to the final Upper Emerald Pools.


You can actually see the green color in the water at Upper Emerald Pools – such a pretty sight! The pools are surrounded by towering 300-foot cliffs on three sides, with a stream of water falling into the pools from the center. The pools are much larger in the spring and fall, and the emerald color gets more intense – and the overhead stream turns into a roaring waterfall!
Oh, also – you’ll really get a sense of how giant the boulders are when you try to get a photo of it. Neither my dSLR lens or phone were wide enough to capture the whole scene (you can see my feeble attempts above). Luckily, Christina had a clip-on wide angle lens for her phone, and it came in super handy here!
The cliffs and boulders provide some nice shade here, so this is also a great spot to stop for a snack or lunch break.


Riverside Walk
Distance: 2.2 miles (1-1.5 hours)
Elevation Change: 57 feet
Shuttle Stop: Temple of Sinawava (#9)
The Riverside Walk follows the Virgin River, leading you to where the Narrows begin. If you plan on hiking the Narrows, you will hike along the Riverside Walk to get there before you start the Narrows hike itself.
Because it is short, flat, and paved, it is one of the best Zion hikes for families and is ideal for people of all ages and abilities.
It is a bit more of a walk than a hike (the name “Riverside Walk” is pretty fitting), but it is one of the prettiest hikes in Zion. There are great views of the Virgin River, with lots of lush vegetation and hanging gardens all along the canyon walls.
This is also one of the best Zion hikes for wildlife sightings – mule deer, wild turkeys, and even blue herons have been known to make appearances along the trail. There are also little side trails that give you river access.


At the end, you’ll come to a point where the canyon is so narrow that there are no land banks on either side of the river. This is where the Narrows start. You’ll find lots of people playing in the water here – it’s a great spot to cool off from the heat (if you’re visiting in the summer), and stop to take a snack or lunch break.
Afterwards, you can continue back to the shuttle stop the same way you came from, or continue onto the Narrows hike (more on that later!).

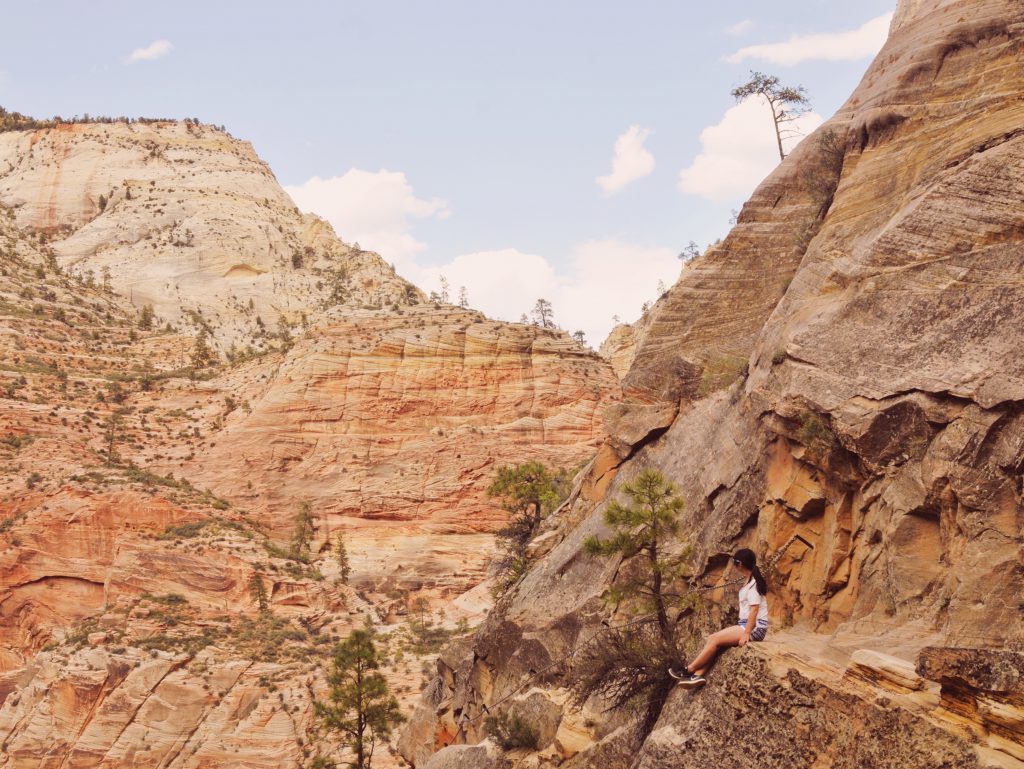
Canyon Overlook
Distance: 1 mile, roundtrip (1 hour)
Elevation Gain: 163 feet
Shuttle Stop: None, drive on Mt. Carmel Highway
If you want a hike that has all the epic views without much effort, then lucky you – Canyon Overlook is the hike for you!
We loved this one so much that we ended up doing it twice (and then came back on a second visit to Zion). I like to call this one the “poor man’s Angels Landing” because it’s got a similarly dramatic view of the Zion Canyon, but with a whole lot less effort. Because of this, it is one of the best hikes in Zion and a must on any trip to the park!
Canyon Overlook is one of the few hikes that start in the East Canyon, so it is not accessible via the Zion shuttle and you will need to drive. From the visitor’s center, take Highway 9 towards the east entrance of the park.

The drive itself is super scenic and another reason why you need to add Canyon Overlook to your list of Zion hikes. You will drive up a series of switchbacks on the mountain. On the left is the Great Arch and if you look closely, you will see people on top of it – this is where the Canyon Overlook viewpoint is.
You will then drive through the Mount Carmel Tunnel. Be aware that the tunnel is completely dark, save for the lights from other cars’ headlights, and from the few windows that are carved out into the tunnel. We had no idea it was going to be completely dark and were kind of creeped out the first time we drove through it, haha!
Because of this, they will control traffic so that it is only going one way at a time in the tunnel. As soon as you exit, there is a small parking lot on the right. The lot fills up quickly, but you can find overflow parking further down the road.

From the trailhead, you will climb up some steps carved into the rock. The rest of the trail is relatively flat here on out, passing through shaded alcoves and over bare slickrockYou will see giant sandstone stonewalls on one side (much of the trail is carved into the rock itself), with sweeping views of the Pine Creek Narrows on the other.
Watch your step as there are giant exposed tree roots and rocks on much of the trail. Also be sure to wear sturdy shoes as the rock tends to get slippery – I didn’t on my first attempt, and immediately regretted it.


At the end of the trail, you will come to a viewpoint that offers sweeping views of the canyon. From here, you can see the switchbacks of Highway 9, West Temple, the Towers of the Virgins, the Streaked Wall, and the Beehives. It is one of the most photogenic spots in the park, which is another reason that Canyon Overlook is one of the best Zion hikes.

I highly recommend watching the sunset from here – seeing those canyons become bathed in golden light is an absolutely magical sight, and the trail is short enough that you can get back before it gets too dark and sketchy (just be sure to bring a flashlight or lantern – we brought this one and it’s awesome because it’s collapsible). Seeing the canyons become bathed in golden light is what makes Canyon Overlook one of the best hikes in Zion!
Best Moderate Hikes in Zion

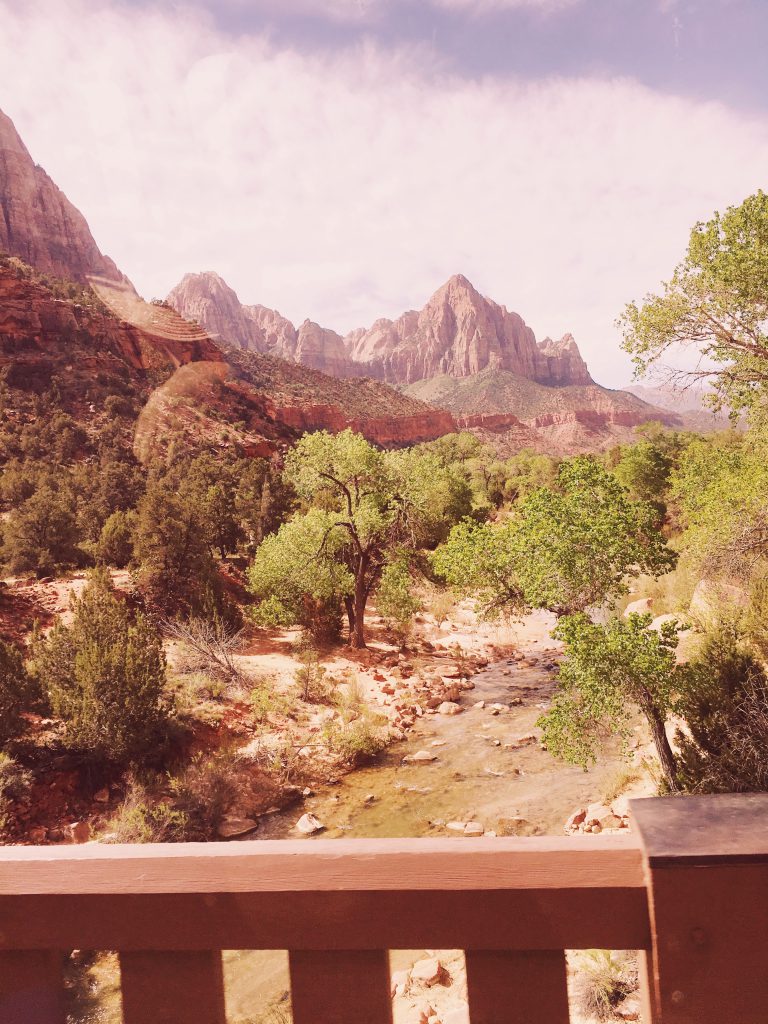
The Watchman
Distance: 3.3 miles (2 hours)
Elevation Gain: 368 feet
Shuttle Stop: Zion Visitor Center (#1)
Ok, so technically you won’t actually hike to the top of the Watchman, one of Zion’s most iconic peaks – but this hike gives you some pretty sweet views of it. It is also a shorter trail and can be done relatively quickly, making it one of the best hikes in Zion, especially if you are short on time.
The Watchman is often overlooked by visitors, and well, it does kind of pale in comparison to some of the marquee Zion hikes, such as the Narrows and Angels Landing. However, it is such a short hike and does offer some majestic views, that it’s worth adding on your Zion itinerary!


The Watchman trail starts over by the Visitors Center, meaning you don’t have to take a shuttle to get started (another reason why it’s one of the best Zion hikes when you have limited time). The first part of the hike isn’t very scenic, but as you start climbing up, it starts to get prettier!
Be aware that most of the trail is in full sun and it gets HOT! We did this hike on a day where it was almost 100 degrees, and boy, I underestimated this one. While the inclines initially didn’t seem so gnarly to me, combined with the heat, I was definitely huffing and puffing throughout the hike. Be sure to carry plenty of water with you!


At the end, you will reach a viewpoint that leads you above the first layer of cliffs, about 300 feet above the canyon floor. In addition to stunning views of its namesake rock, you will also see beautiful views of the Towers of Virgin, Bridge Mountain, and the entire town of Springdale. There is also a small loop trail here that will give you even more views to the south.

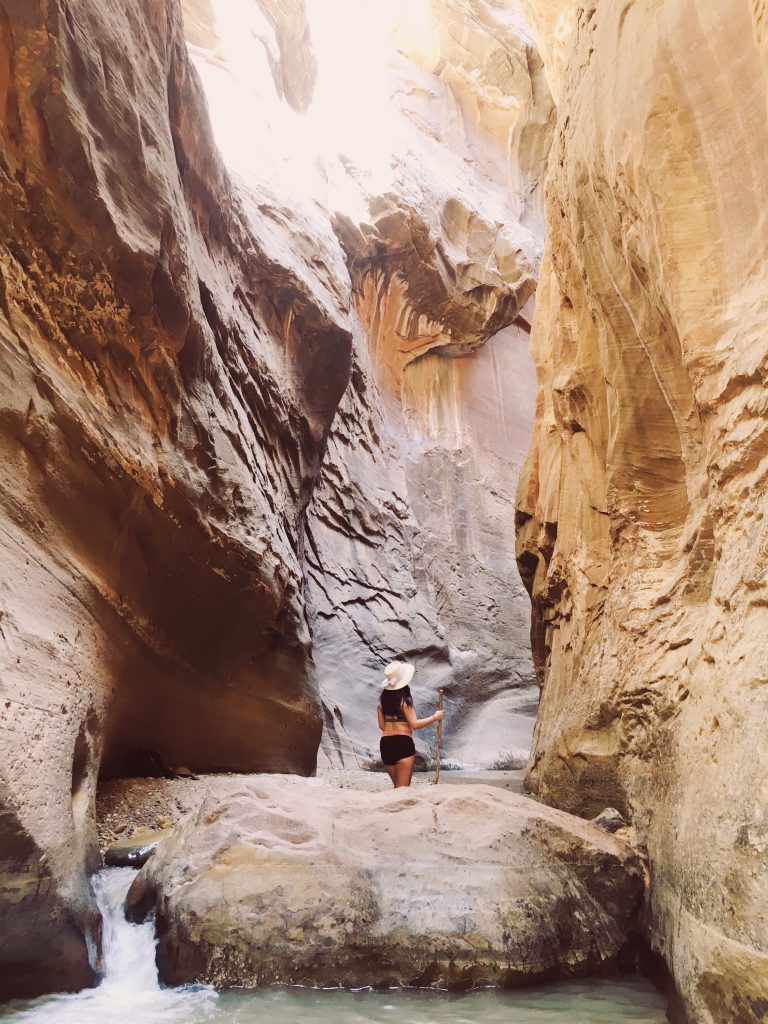
The Narrows
Distance: 4-9 miles (~5-8 hours, depending on how far you go)
Elevation Gain: 334 feet
Shuttle Stop: Temple of Sinawava (#9)
If you are looking for one of the best Zion hikes that is both unique as well as stunning, then you can’t do much better than the Narrows. The Narrows is one of the most iconic Zion hikes and gives you an unforgettable experience of hiking in the north fork, through the narrowest section of the Zion Canyon. This is a quintessential slot canyon hike – you should definitely add the Narrows to your bucket list of Zion hikes!
More experienced hikers can opt to do the entire 16 mile span of the Narrows as a top down hike, in either a day or overnight hike. The top-down option requires hikers to secure a wilderness permit, as well as transportation to Chamberlain’s Ranch, the starting point for the hike.


Instead, most people (including us) choose to do the Narrows as a bottoms up hike. This is one of the most popular Zion day hikes, and the easiest way to experience the Narrows.
You can choose to make the hike as long or strenuous as you like, depending on your abilities. For a strenuous all-day adventure, you can go as far upstream to Big Stream, the end point for the bottoms up hike. Otherwise, you can choose to hike only a portion of the bottoms up hike.
From the Temple of Sinawava shuttle stop, you will first start hiking on the Riverside Walk to get to the beginning of the Narrows. Once you get to the river, you will get into the water to continue onto the Narrows hike.
This is definitely one of the most unique and magical hikes that I’ve ever done, and was definitely one of my favorite Zion hikes (tied with Angels Landing). The scenery is absolutely breathtaking throughout, and it was cool to see how it changes as you get deeper into the canyon. We definitely made many stops along the way to oooh and aaah and snap lots of photos!
The water level is about ankle deep when you start the hike, and progressively gets higher as you continue deeper into the canyon. The water levels can change based on the time of year, and the amount of rainfall that occurred. At the highest point, the water was about waist-high. Most of the hike is done in knee-deep water.


Most hikers aim to reach Wall Street, which is the beginning of the narrowest part of the canyon, about two miles into the hike. It takes about 2.5-3 hours to get to this point. I highly recommend hiking up to Wall Street, as the scenery here is absolutely mesmerizing!
Seeing the light streaming through the narrow canyon is pure magic, especially if you reach this point between 10am-3pm. The spectacular scenery that you see throughout the Narrows is what makes it one of the absolute best hikes in Zion!


Some then choose to explore Orderville Canyon, a tributary canyon on the east side of the river that is known to be taller, darker, and even more enchanting than the main part of the Narrows.
If you make it this far, you will find that the hike gets much more challenging, and that a lot more scrambling is involved. After this point, it is about a half mile to reach Big Springs. This is the furthest you can go when doing the bottoms up Narrows day hike.
We hiked up to Wall Street and continued for a bit until we came across a side trail. However, because there is a fair amount of rock scrambling involved after this point, we ended up turning back shortly after the fork. In all, the hike took us about six hours.
Some Tips for Hiking the Narrows
- You will need a pair of sturdy water shoes (my friend Christina also did this in a pair of hiking sandals and that worked out) and a walking stick (or hiking poles) to hike the Narrows. The rocks can get VERY slippery and I definitely slipped a few times, even with the proper gear! We saw people attempting the hike barefoot or even in flip-flops and they were struggling HARD. A wet bag is also recommended for this Zion hike because the water can get up to waist deep.
- I rented all my gear at Zion Outfitters, which is located just outside the park’s entrance. A one-day rental for water shoes, a walking stick, and a wet bag came out to about $50.
- The Narrows are best hiked during the late spring and summer months, when the water temperature is the warmest and the water levels are at the lowest. However, the Narrows can be more susceptible to flash floods during this time. The fall months bring more stable weather, however, the days are shorter and the water gets colder. Yes. you can hike the Narrows in the winter, but be prepared for cold water temps, and for trail closures due to snowmelt.
- The water levels at the Narrows fluctuate greatly year to year and day to day. The hike gets more challenging when the water levels get above 70 CFS (cubic feet per second), when and the water can frequently be thigh-deep, and even get as high as chest-deep! When the water levels reach 150 CFS, the Narrows are closed. Please check current conditions here before planning for this Zion hike.
Learn more about hiking the Narrows.
**NOTE: The National Parks Service has advised that toxic cyanobacteria has been found in the Virgin River and advises against contact with the North Fork of the river. More information here.
Best Strenuous Zion Hikes
Hidden Canyon
Distance: 2.5 miles, roundtrip (2.5 hours)
Elevation Gain: 850 feet
Shuttle Stop: Weeping Rock (#7)
The Hidden Canyon trail is one of the most unique Zion hikes because it literally takes you to the mouth of a hidden canyon, tucked away above the main canyon east of the Great White Throne.
If you are looking for to escape the crowds that are common on some of the most popular Zion hikes (i.e. Angels Landing or the Narrows), then Hidden Canyon is a great choice. For most of the hike, we were the only ones on the trail and it was nice to have that peace and quiet, especially since the rest of the Zion hikes we chose were crowded. You get the feel that you are exploring, well, a hidden canyon, and that’s what makes this one of the best hikes in Zion.

Hidden Canyon is a short but steep hike, with almost a 1000 foot elevation gain in a mile. Much of the first part of the trail is also in full sun. I definitely found this part to be challenging and had to stop for tons of breaks – that’s okay, because the views are absolutely stunning so this gives you an excuse to soak them up and snap tons of photos!
The hike starts at the Weeping Rock trailhead and shares the same trail to Observation Point for the first ¾ mile, after which you will come to a junction. Take a right to continue onto Hidden Canyon. While many people hike both Hidden Canyon and Observation Point on the same day, we were running the Zion Half Marathon the next morning and didn’t want to tire out our legs too much. Next time!
A series of short, steep switchbacks follow, after which you will continue along a narrow trail that essentially scales the side of a cliff, descending into a shaded valley that leads to the mouth of Hidden Canyon.


There are chains attached to the canyon walls here to help you with this portion of the hike, although there are also some exposed parts. Wear sturdy shoes with a solid grip, watch your step, take your time, and use caution. This part of the hike was my favorite because not only was it a thrilling experience, the views were absolutely stunning!
If you are planning to hike Angels Landing, this is a great warmup hike! We ended up doing Angels Landing the next day, and I felt that using the chains on this part of the Hidden Canyon trail definitely prepared me and was a good training run. Because I had used the chains at Hidden Canyon, I felt much more comfortable on the final ascent of Angels Landing and it felt less scary and sketchy to me because I had a solid feel for how to use the chains to my advantage.
After this, you will come upon a sign telling you that this is where the maintained portion of the trail ends, and that you’re on your own from here on out. The next part of the hike takes you into Hidden Canyon itself, and continues for about a mile.
Hiking through the canyon is sort of like hiking through an obstacle course – a fair amount of scrambling over giant boulders and fallen trees is necessary. When you see a small free-standing arch, you will have come to the end of the trail and a sign warns you not to venture any further.


To be honest, I found the end of the hike to be a bit anticlimactic. I’m not sure what exactly I was expecting, but I was rather unimpressed by the arch that awaited me at the end, especially after all that effort scrambling up those rocks.
Still though, the unique experience of scaling the side of the cliff on the way into the canyon, and the epic views along much of the trail makes Hidden Canyon worthwhile and one of the best Zion hikes!
Note: The Hidden Canyon trail is currently closed due to rockfall damage at Weeping Rock. You can keep updated on current trail conditions here.
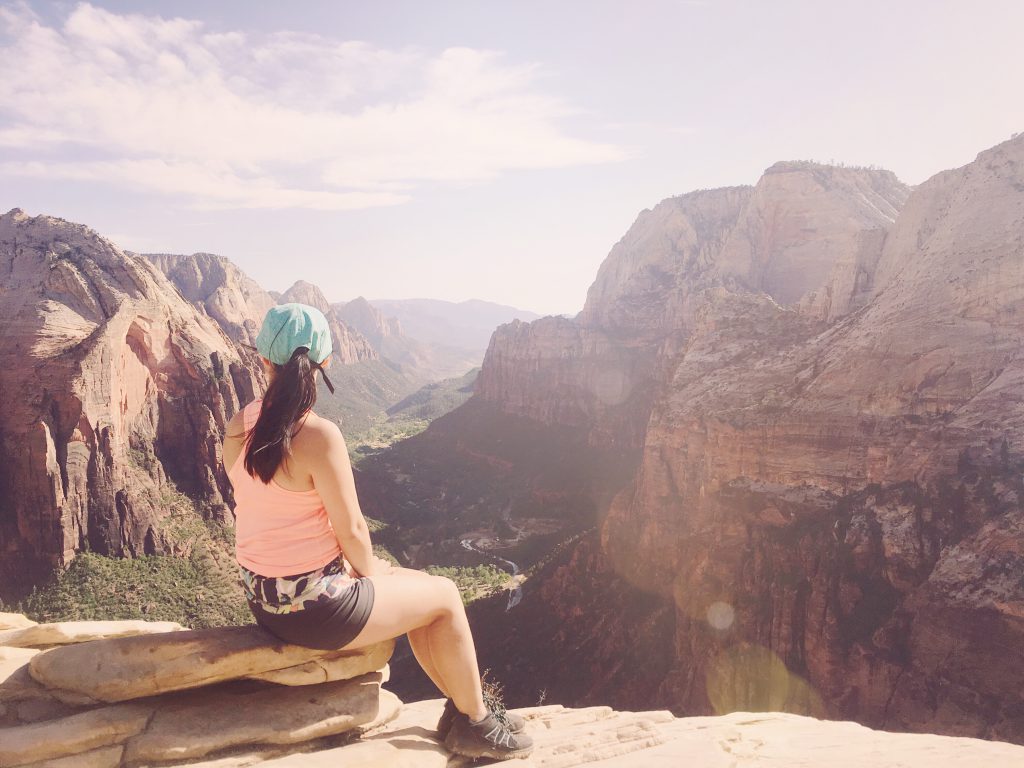
Angels Landing
Distance: 5.4 miles, roundtrip (4-5 hours)
Elevation Gain: 1488 feet
Shuttle Stop: The Grotto (#6)
Angel’s Landing is perhaps the most iconic of all the hikes in Zion National Park. This one ends up on a lot of hikers’ bucket lists, and for good reason! This classic Zion hike is famous for being the most thrilling, dangerous hike in the park, if not one of the most dangerous in the world.
It is definitely one of the most popular and famous Zion hikes, and therefore attracts a huge crowd. Chances are that if you know anything about Zion, then you’ve probably at least heard of Angels Landing. Many people say that this is one of the best hikes in Zion – if not the absolute best!
The funny thing is, I hadn’t even originally planned to hike Angels Landing. I was a bit apprehensive about it, and I wasn’t even sure it would be worth the hype.
We had originally planned to hike Observation Point, but by the time we arrived in the park after running the Zion Half Marathon in the morning (yup you read that right, I’m the crazy person who ran a half marathon AND hiked Angels Landing on the same day), we were concerned that we would miss the last shuttle. Since Angels Landing is shorter in both distance and duration, we made a last-minute decision to do that instead of Observation Point.
Is it scary? Yup. Is it hard? Double yes. Is it Crowded? Very. Is it worth the hype? 1000000000% YES. It is hands-down the most thrilling and memorable of all the Zion hikes!


The first half of Angels Landing takes you on a merciless 1000 foot ascent, a leg-burning, unforgiving stretch during which you will mostly likely be cursing yourself and wondering why the hell you even decided to do this hike in the first place (or was that just me?).
At the end of this stretch are 21 sharp, steep switchbacks named Walter’s Wiggles which, to me, were by far the worst part of the hike. I was definitely out of breath and my legs definitely were jello after this part, and it made me almost want to quit (and want to yell out a bunch of expletives).
After you survive Walter’s Wiggles you will arrive at Scout’s Lookout, which is the perfect spot to take a break and catch your breath. This is the turnaround point for those who do not wish to make the final 500 foot vertical climb to the summit. If you have a fear of heights, then it is a good idea to turn back at this point.
You can REALLY see just how narrow the path is – gulp. My two friends who I was with took one look at what lay ahead and said no thanks. Me, on the other hand…well I’d made it this far, so #challengeaccepted.
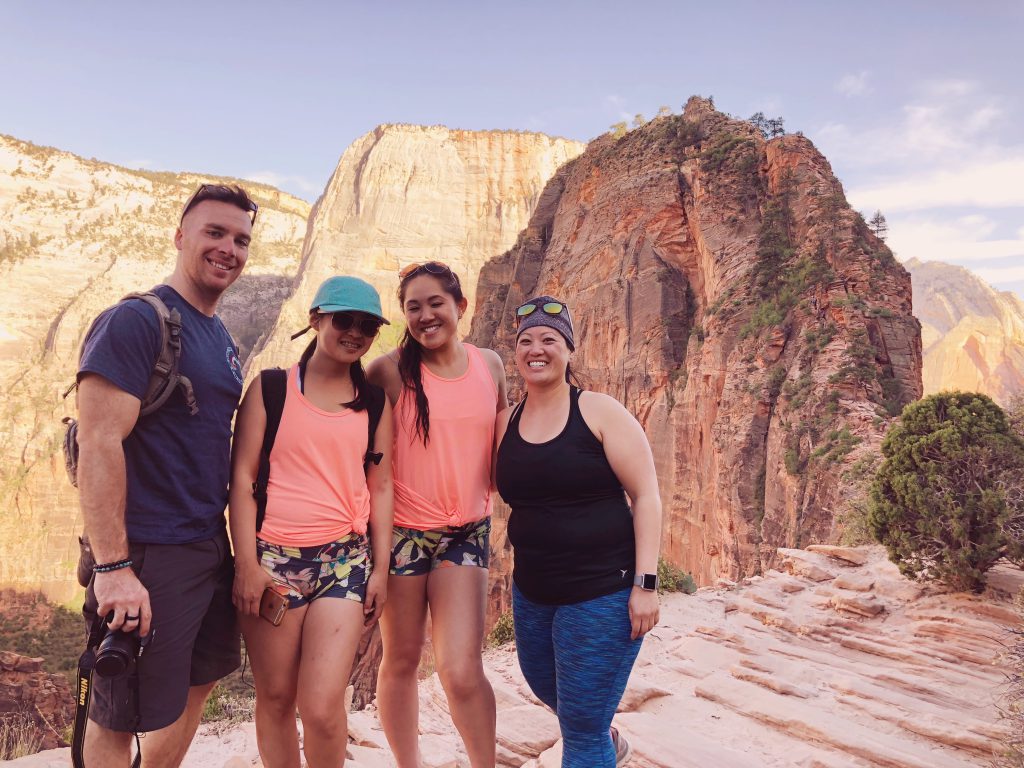
And so I set off to the top with some new friends that I made on the hike. Funny backstory here: while we were waiting for the shuttle earlier that day, this girl tapped me on the shoulder and pointed out that we were wearing the same outfit (that I had purchased at Walmart the night before because I didn’t pack enough shorts). We ran into each other again at Scouts Lookout and they let me tag along with them to do this final ascent of the hike. Such a coincidence, eh?
Anyways. This last 0.5 mile stretch is steep, narrow, and crowded. The ridge is so narrow that it is essentially a single file. Add to that the fact that Angels Landing is by far one of the most popular Zion hikes, and you are going to encounter some traffic. The key here is to be patient. People are generally nice in this stretch, letting you pass through, and vice versa.


There are some barricades and chains for you to hold onto, but for some parts it’s just you and the 1000 foot drop-offs on either side. At some points, the trail is only about 4-5 feet wide. And yes – eight people have died here since 2004.
So yes, it’s kinda scary (maybe a lot) – but I honestly was concentrating so hard on figuring out the my step that I didn’t have time to look down, just at what was in front of me!
It goes without saying that good, sturdy shoes are absolutely essential for this last part of Angels Landing – you do not want to slip and fall here because your shoes did not have enough grip! You will also do a fair amount of scrambling here, so also want to make sure that you have solid footing and a solid grip before making your next move. Just remember – one step at a time!
It is an absolutely exhilarating experience, and I highly recommend it if you’re up for the challenge! This thrill is definitely what makes Angels Landing one of the best hikes in Zion.


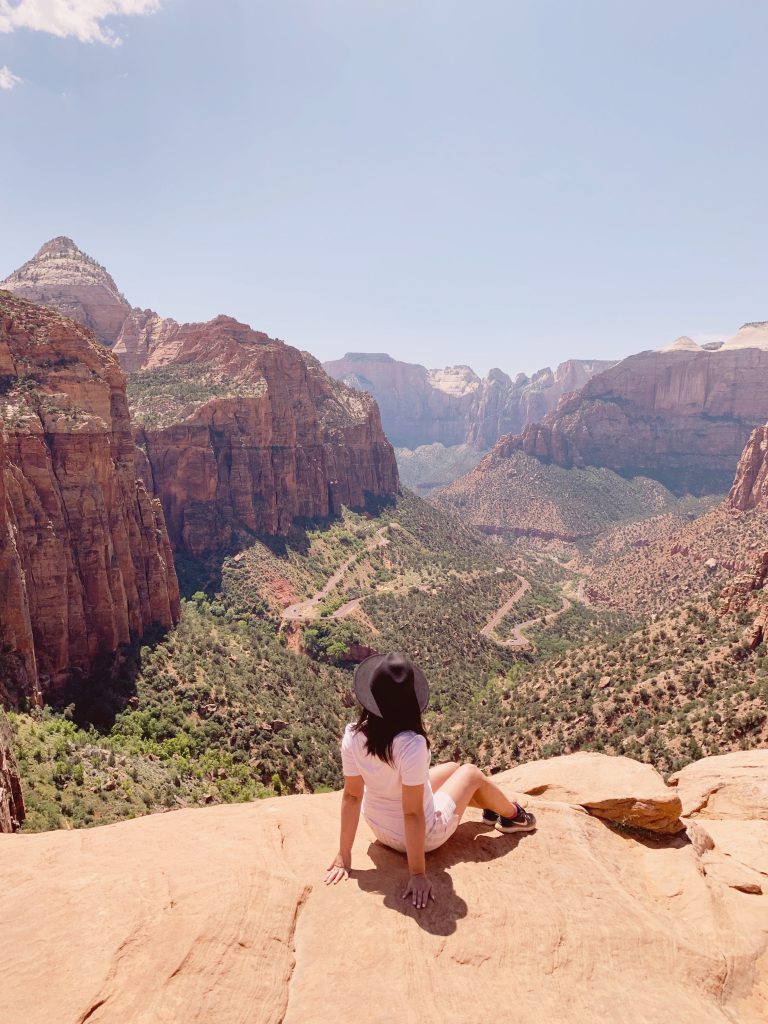
After the climb, you will finally come up to the summit, and all that effort will be absolutely worth it! The elevation from the top is 5790 feet and the views are absolutely spectacular! You will be rewarded with a stunning panoramic view of Zion’s towering canyons and the valley floor. I know I compared the view from Canyon Overlook to Angels Landing, but the view from here is much, much more expansive and is much more epic.
We spent a bit of time at the top to take a break, soak in the view, and snap a bunch of photos. We ended up summiting at around 5pm (or 3 hours before sunset), and the lighting was a bit harsh and there were a ton of shadows, so it was hard to take a great photo.
A better time to photograph Angels Landing would be early in the morning (this will also allow you to avoid the crowds), or around sunset (but be aware that you may miss the last shuttle and have to walk the three or so miles back to the Visitors Center – also I would NOT want to do the climb back down in the dark).
There is a bit of a debate on whether it’s worse going up or coming down from Angels Landing. I personally found it worse going up, but my new friend found it worse coming down. Either way, expect a lot of traffic trying to get down from the summit, and be patient.
If you’re up for the challenge, I highly recommend you do Angels Landing – it has a reputation for being one of the best hikes in Zion for a very good reason, and is definitely one of the most epic Zion hikes!
Other Hikes in Zion National Park
These two Zion hikes were on my list, but we just didn’t have enough time for them. I am telling you a little about them anyway, because I’ve heard great things about both of them!

Observation Point
Distance: 8 miles, roundtrip (6-7 hours)
Difficulty: Strenuous
Elevation Gain: 2148 feet
Shuttle Stop: Weeping Rock (#7)
Can’t get enough of those jaw-dropping views…or want to avoid the crowds at Angels Landing? If either (or both) of these things are true, then Observation Point may be the Zion hike for you!
I originally had planned to hike Observation Point over Angels Landing, because the elevation gain is more gradual, the drop-offs are far less scary, and much less crowded. It also puts you about 700 feet higher in elevation than Angels Landing at the end, so you can feel like you’ve really conquered Zion.
However, Observation Point is one of the longest day hikes in Zion, so you will have to allow about 6-7 hours to complete the trail. Unfortunately, we planned to do this on the day of the Zion Half (don’t ask me why, we be cray), and by the time we had finished the race, eaten lunch, and entered the park, it was already 2pm. The last Zion shuttle departed the Weeping Rock stop around 8pm. That was cutting it reeeeeal close – so we decided to pass and do Angels Landing instead,
The Observation Point trail follows the same trail as Hidden Canyon in the beginning, so if you are planning to do that one, it makes sense to do it all in one day. Along the way, you get a look into the mysterious Echo Canyon and the stunning White Cliffs.
While there are a few sheer drop-offs along the way, there are not nearly as scary as the ones at Angels Landing. They are also much wider and there are far less people on the trail, so you also get to avoid the massive traffic jam.
The views from the top are supposed to be even better than from Angels Landing, which makes sense because…did I mention that you are 700 feet higher up?
Someday, someday…Observation Point is hands-down #1 on my list of Zion hikes if I visit the park in the future!
Note: The trail to Observation Point is currently closed due to a rockfall damage at Weeping Rock. You can keep updated on the most current trail information here.
The Subway
Distance: 9 miles (6-10 hours)
Difficulty: Very Strenuous
Elevation Gain: 1300 feet
Trailhead location: Left Fork Trailhead, about 1 hour from Zion Canyon
If you are looking for a hike that is similar to the Narrows but want a much bigger challenge, then the Subway is the Zion hike for you. The Subway is located in the Left Fork of North Creek. The hike gets its name because a section of it resembles an underground subway tunnel.
If you do this one – be prepared to swim/wade/climb/scramble. Also be prepared for some COLD water temperatures! You can either hike the Subway in either direction. Hiking top down requires more technical ability, but you get to access some of the most beautiful parts of the canyon. Hiking from the bottom will help you avoid rappelling and some of the cold water, though.
You must also secure a wilderness permit in order to hike the Subway. The permit is valid for day use only – most hikers complete the Subway in 5-9 hours. There are 80 permits issued every day – there are lotteries for both advance permits and last-minute permits. More information on permits is available here.
It is also imperative that you keep an eye on current trail conditions as things can change FAST and this one can get sketchy AF real quick!
If you do attempt this one, be sure you do it with someone who has some canyoneering experience. If you are lucky enough to conquer it, you will have the thrilling experience of hiking through one of the most remote and challenging parts in all of Zion!
Note: The Subway is currently closed due to current health restrictions. You can keep updated on the latest trail information here.

What to Pack for Your Zion Hikes
It is important to be prepared for all situations when tackling these Zion hikes! Having the right gear is important. Be sure to add the following items to your packing list for your hikes in Zion:
- A jacket: A packable windbreaker like this one is ideal for the warmer months, and a packable puffer like this one is great for cooler weather.
- Good shoes: Sturdy hiking shoes with grip are absolutely essential, especially on trails the more treacherous such as Angels Landing! I just got a pair of these Merrell Siren Edge shoes and absolutely LOVE them – I usually haaate hiking shoes because they are too bulky, these are super lightweight (almost like sneakers) but with plenty of grip and traction.
- Day Pack: Something like this backpack is perfect for holding all your gear, snacks, camera equipment, and more on your Zion hikes. You can also get a hydration pack for easy access to your water.
- Water: And speaking of water…carry plenty of it! I carry this water bottle with me everywhere I go, and I love it for hiking because it’s insulated and the water stays cold. It also comes in a variety of sizes to suit your needs.
- Flashlight or Lantern: Especially if you plan to hike around sunset – you don’t want to be caught in complete darkness! My friend Christina brought along this handy collapsible lantern and I loved it so much that I had to get one for myself.
- Trekking Poles: They will definitely help you on the harder Zion hikes, and are a necessity on the Narrows. Get a collapsible pair like these so they fold up easily into your luggage.
- Water Shoes and Wet Bag: For the Narrows. Get something with good grip because the rocks can get super slippery! These shoes and this bag get great reviews (and come in a lot of sizes and colors).
- Battery Pack: I never travel or hike without this one. It can charge up to five times on one full charge!
- First Aid Kit: Be prepared, just in case! This one is compact but has all the essentials.
- Snacks: I always have some protein bars on hand to fuel me up on a hike. These Think bars are my favorite!


When to Go to Zion National Park
The best time to visit Zion National Park is during the spring – this is when the weather is warm but not too hot, and the heat hasn’t dried out all the water yet. This means that you will see some spectacular pools and waterfalls, especially on the Emerald Pools hike! However, the increased water levels might mean that some trails (such as the Narrows) are closed.
Fall is also a great time to visit, but the days are shorter and the temperatures are cooler – which is not necessarily a bad thing for most of these Zion hikes, except if you want to do the Narrows, then you will experience some cold water temps.
The peak season for Zion is the summer months (May-September). This is when you will experience the most crowds and the hottest temperatures – it can sometimes get up to 100 degrees Fahrenheit!
The summer months are a great time to visit if you plan to hike the Narrows, since the water levels are at their lowest and water temperatures are warmer. However, be aware that Zion is prone to flash floods during this time of year, and this may shut down some trails!
Winter may be a beautiful time to visit Zion, and this is when you will basically have the park to yourself. However, you may experience ice on these Zion hikes – be careful! Ice and snow may also shut down some trails.
We visited at the end of April, because well, that’s when our race was (FYI, if you want to run the Zion Half, it is usually held at the end of February but ended up getting moved to April the year we ran it). We visited a second time when running the Grand Canyon Half, since we were staying in Kanab.
No matter what time of year you visit Zion National Park, be sure to keep an eye on current trail conditions here!
How to Get to Zion National Park
The nearest airport to Zion National Park is in neighboring St. George (SGU), about 40 miles away. However, it is a smaller, regional airport and direct flights are limited. American Airlines, Delta, and United serve SGU through its regional hubs Phoenix and Dallas (American), Salt Lake City (Delta), Los Angeles and Denver (United). If you wish to fly into SGU, you must connect through one of these airports.
St. George Regional Airport is served by four major car rental companies: Avis, Budget, Enterprise, and Hertz. Renting a car during your visit to Zion National Park is highly recommended (as it will give you the maximum flexibility to create your own schedule and do these Zion hikes), but if you do not wish to drive, the St. George Shuttle offers shuttle service directly into Springdale and the Zion Canyon.
The nearest large international airport to Zion is McCarran International Airport (LAS) in Las Vegas, About 170 miles away. From here, you can connect to many destinations both in the United States and around the world.
McCarran is served by many major car rental companies. To get to the rental car center, follow the signs for the shuttle once you get to baggage claim. From here, it is about a 2 hour and 45 minute drive to reach Zion National Park.
Again, renting a car is highly recommended, but if you do not wish to drive, you can arrange for a private shuttle transfer both to Zion and back to Las Vegas.
Another option is to fly into Salt Lake City International Airport (SLC), located about 300 miles away. You have many options for rental car companies from SLC airport as well. The drive time to Zion National Park is about 4 and a half hours. There is also long-distance shuttle service offered by St. George Shuttle.
Both times that we’ve visited Zion, we flew into Las Vegas and rented a car from there. This gives you the maximum number of flight options and the greatest flexibility to do the best hikes in Zion!

Visiting Zion National Park via Guided Tour
If you are spending most of your time in Las Vegas and want to add Zion as a side trip, you can also opt to take a day or 2-day tour of Zion. Again, renting a car and creating your own itinerary with all the Zion hikes you want to do will give you the greatest amount of flexibility, but if you are the kind of person who wants all the details taken care of you, then this can be a great option for you!
Here are some of the top-ranked tour options that I’ve found:
- Zion Day Tour: This tour includes transportation to and from Las Vegas on a luxury bus. You will have six hours to explore Zion on your own. This will give you time to do one longer Zion hike (such as Angels Landing or the Narrows), or two smaller ones. Lunch is also included on this tour.
- Zion 2 Day Tour: This tour option gives you two days to explore Zion National Park, giving you more time to do more of the best hikes in Zion, and to really explore the park! This option also includes lodging, so you won’t have to arrange it on your own.
- Zion + Bryce Canyon Small Group Tour: This option also gives you an opportunity to see the hoodoos of Bryce Canyon National Park, in addition to Zion National Park. The tour is limited to 14 people. In my opinion, I think it’s a bit rushed to see both Zion and Bryce Canyon in one day – however, if you want to see both parks and have limited time (and I really think you should see both because they are both amazing!), then this may be a good option for you.
- 7-Day Utah, Arizona, Nevada Self-Drive Tour: If you want to see all the spectacular National Parks of Utah, Arizona, and Nevada (such as the Grand Canyon, Bryce Canyon, Monument Valley), and want the flexibility of driving but with an insider guide at each park, this is a great option! You will get to drive on the scenic highways of the area, and a knowledgeable Navajo guide will meet you at each park. Camping equipment and fees are included in this tour.
Where to Stay Near Zion National Park

Accommodation Options Inside Zion National Park
- Camping: Zion has three campgrounds. Two of them (the South Campground, Watchman Campground) are in the main park area. The third, Lava Point Campground is located in the Kolob Canyon area, about an hour away from the main park. You can make reservations on Recreation.gov. More information about camping in Zion is available here.
- Zion Lodge: This is the only lodging available inside the park. There are 75 rooms, 6 suites, and 40 cabins available. This is the most convenient accommodation option, as you are staying right inside the park, and as such, reservations book up fast! You can check availability, rates, and more here.
Where to Stay in Springdale
If you can’t secure accommodations inside the park, then Springdale is the next best option. You can even hop on the Zion shuttle in town, making park access a breeze. Here are some of the top choices for accommodations in Springdale:
- Desert Pearl Inn: Just 0.8 miles from the entrance of Zion National Park, this award-winning hotel is eco-friendly and features contemporary amenities. The furnishings and decor accents are handcrafted and reflect the Southwest. A heated pool (seasonal) and hot tub is also available.
- Majestic View Lodge: The Majestic View Lodge offers cabin-style lodging, with homey rooms featuring woodsy decor. The rooms feature private balconies/patios, kitchenettes, and whirlpool tubs. There is also an on-site wildlife museum, and admission is included with your stay. Just 2.6 miles from the park entrance, you can easily access Zion via shuttle.
- Zion Park Motel: A great option for those seeking to stay close to the park but on a budget. Amenities include an in-room microwave and mini-fridge, a heated pool, a picnic area, a children’s playground, and a shaded sundeck.

Accommodation Options East of Zion (Mt. Carmel/Kanab)
These options are situated outside the eastern entrance of Zion National Park, along the Mt. Carmel Highway (Hwy 9). Staying on this side of the park is also a good option if you are planning to visit some of the other state and national parks in Utah and Arizona (i.e. Grand Canyon North Rim, Bryce Canyon, Capitol Reef).
- Zion Mountain Ranch: Sitting right outside the eastern entrance of Zion National Park, these upscale cabins feature Southwestern and/or Native American decor, private porches, and gas fireplaces. Some rooms even have an option for a sauna or massage rooms. The Zion Mountain Ranch is located on a ranch with its own buffalo herd, providing a unique accommodation setting.
- Parry Lodge: This storied hotel gives you a taste of old-school Hollywood, and dates back to 1931. There is a retro-chic vibe here, and some of the rooms are named after the hotel’s famous guests.
- Canyons Boutique Hotel: This boutique hotel has contemporary amenities with a Victorian flair. The rooms are charming, and are recently renovated. Some amenities include free breakfast and free bike rentals for exploring town.
Accommodation Options West of Zion (Hurricane/La Verkin)
This is your best option for accommodations near Zion on a budget. Staying in this area puts you about 30 minutes away from the south entrance of a park, and the rates are affordable.
- La Quinta Inn & Suites La Verkin: This modern hotel gives you beautiful views of the Pine View Mountains and Zion. The rooms are basic but have what you need. Amenities include a pool, complimentary breakfast, and a 24-hour gym.
- Under Canvas Zion: If you are interested in glamping in Zion, then check out Under Canvas. The permanent tents include wooden floors, private decks, and wood stoves. There are also fire pits, hammocks, and yoga classes.
- Wingate by Wyndham Hurricane: This is a relatively new hotel to the area, and features modern amenities in a relaxed setting. Amenities include an outdoor pool, exercise room, and complimentary breakfast.

Airbnbs Near Zion
Many Airbnbs properties are also available in the towns surrounding Zion. This is a great option when traveling in a group. It is also a great option if you are looking to travel to Zion but want to maintain social distancing.
There are even some unique accommodation options, including glamping tents! Here are some of the more unique properties that I found:
Pictures and Words is a participant in the Airbnb Associates program – this means that I receive a small commission when you make a booking, at no extra cost to you.
Where to Eat Near Zion National Park
If all these Zion hikes have left you hungry, then no worries! There are many yummy dining options in Springdale, right outside the park.
Here are some of the best spots in town to get a delicious pre- or post-hike meal:
Cafe Soleil
Cafe Soleil is a great spot to pick up a sandwich or wrap to take with you on your Zion hikes. All of their sandwiches, wraps and salads are made from fresh and organic ingredients so you can be sure that you are fueling your body with some healthful food on your Zion hikes.
Oscar’s Cafe
Eat some delicious Mexican fare on the patio at Oscar’s, and enjoy the view! Be warned though, the portions here are HUGE – the burrito that I ordered was bigger than my arm. Their tamales and burgers are tasty as well.
MeMe’s Cafe
We stopped at MeMe’s Cafe for dinner on the way out of Zion a few times, and loved the friendly service and delicious food. They have great crepes, sandwiches, and burgers here. If you are looking for a post-hike drink (am I the only one who craves a beer after every hike?), they have a great selection of local Utah craft brews and wines.
Have you been to Zion National Park? What are some of your favorite Zion hikes?
You might also like:
Hiking the Narrows: Everything You Need to Know
Incredible Things to Do in Bryce Canyon
Things to Do in Grand Canyon North Rim
Fun Things to Do in Tempe, Arizona
Fall in Yosemite National Park
The Perfect One Day in Joshua Tree Itinerary
50+ Gift Ideas for National Parks Lovers
Like this post? Pin it on Pinterest!


Caroline is a Southern California based traveler, writer, and photographer. She travels all around California, the US, and the world in search of the most colorful places, the most delicious food, and bucket-list adventures. Her aim is to inspire other travelers discover how to add more adventure and joy to their lives. On Pictures & Words, you’ll find detailed guides + itineraries, along with vibrant photos to help you plan the the most epic trips. When she’s not traveling, Caroline also runs half marathons.
Kelly
Monday 13th of July 2020
These photos are all so beautiful! I would love to visit Zion and love all of these suggestions for hikes, areas to visit and photo spots :)
Portia Jones
Sunday 12th of July 2020
This is soooo high on my bucket list. Hopefully, i'll be able to get over next year. Thanks for a great article. x
Nancy Hann
Sunday 12th of July 2020
Great post with lots of helpful info! I only visited Zion once, many years ago...before the shuttles. It is truly gorgeous. Thanks for including the warnings about flash floods. Many people don't realize that a storm many miles away can result in a deadly flash flood where you are. The same goes for Antelope Canyon and the many canyons in the southwestern U.S.
Anuradha
Sunday 12th of July 2020
I have never been to Zion National Park, but heard so much and a read a lot about how beautiful the park is. Would never miss visiting the park when we are travelling in US. Have pinned this post for my future travel reference.
Margarita Ibbott @DownshiftingPRO
Sunday 12th of July 2020
That was an epic post. Thanks so much for sharing your firsthand knowledge, tips and insights into the best hikes. I love how to hold the TRUTH about how easy or challenging the hikes are.